
# 1
Curt Trailer Hitch Receiver - Custom Fit - Class III - 2"
 2015 Toyota Sienna
I installed the hitch on a 2004 Sienna. Very happy that Toyota pre-fits bolt holes. My wife bought a newer 2015 Sienna and when I'm done beating up her old van I can move the hitch to the new one! Only issue on the van is that the hitch sits pretty low to the street (I flipped the ball on the mount to gain some height). But it works fine and was easy to install. It was a great purchase, thanks, Paul Note: cleanout and test your bolt holes before wrestling with the hitch. Instructions said to remove the tailpipe holder, I was able to just wiggle the tailpipe out of the way.
Took me and my 15 year old son about 30 minutes to attach the 2" Curt hitch. I did not reattach and cut the bottom plastic cover on our 2015 Sienna XLE. I left it off during our trip and when we returned I removed the hitch all together and put the cover back on. I will reinstall the hitch for our next trip. My driveway is steep and bottomed out every time pulling in and out. The bottom of the hitch was 7" off the ground as you will see in the attached photo. I did have to spread open the hitch about 3/4" to install. I used a floor jack and a 2x4 which made this a quick and painless. I did not take a picture of this part. Just stand the hitch on end and put the floor jack inside with the 2x4 on top standing up. a few pumps of the handle did the trick for me. I'm sure any jack will work.
# 2
Draw-Tite Max-Frame Trailer Hitch Receiver - Custom Fit - Class III - 2"
Hides great underneath! Easy to install. Draw-Tite has always been our go-to for trailer hitches.
I chose this hitch because of it's hidden profile which it does well (2015 Sienna). It was simple enough to install as most hitches are. Most will need some sort of mild prying or adjustment during installation! On this hitch you only need to cut a small area out of the lower shield where the receiver is (simple). For the muffler, shove it over by hand and block it over using a wooden block (2X4 etc.) this will allow you to access the bolts. The bolts are not nickel plated so it is wise to add corrosion to them. The hitch itself is well made and has a durable coating, it was shipped in a box and arrived without damage of any type. Very happy with my purchase!
# 3
Draw-Tite Max-Frame Trailer Hitch Receiver - Custom Fit - Class III - 2"
Definitely try top have someone help you install, it makes the job much easier. I did it myself and it was tedious but Do-able. Videos make it very helpful and trimming the skid plate is also a pain. Be careful when removing the plastic trim tabs because they can be brittle due to there location. Overall I am very happy with the installation and it looks and functions well.
Easy to install -- I ran out of time but watched the mechanic do it -- took about 20 minutes on the Sienna -- literally 6 screws -- on the Sienna, only thing to be aware of is it really does ride low to the ground however, it is well hidden and for my Yakima Bike Rack it does a great job -- if you were looking to hook up electric, it has a really nice mounting post to put your electrical too and it is nice has 2 holes -- for the hitch pin -- both sizes --
# 4
Draw-Tite Trailer Hitch Receiver - Custom Fit - Class II - 1-1/4"
Installed on a 2004 Toyota Sienna LE in about 15 minutes. Everything needed for install was included. Did not have to remove anything from car as directions stated you might. Basically stuck hitch up under van and put the six bolts in and finished. Make sure you have the torque wrench. Tongue in normal position sits about 11 inches off the ground. Don't forget you will need to buy a ball and a wiring harness for the van.
2015 Toyota Sienna. Install was straight forward. I was able to reinstall the entire appearance cover by cutting a slit for the driver's side hitch attachment plate. The instructions said to only reinstall the rear of the cover after cutting & removing it from the main part.
# 5
Curt Trailer Hitch Receiver - Custom Fit - Class III - 2"
I did drop the exhaust which consisted of spraying the rubber mount with WD 40 and pulling hard. I put hitch into place and started the nuts with no help from others though 2 people would be easier. Installation couldn't have been easier. There is no reason to pay extra for the hidden hitch models because all you can see is the square hitch, everything else is hidden with this model and you don't have to do all the drilling. 15 minute install if you have the tow hooks off. Very easy upgrade to my Toyota Sienna, $150 makes an already versatile vehicle even more so.
Fit-up on our 2002 Sienna was excellent and painless. This is one of the easiest hitch installations I've ever done. The recommended 3-3/4" drop ball mount put us about 11" off the ground, which was way too low. We switched to a 2" drop mount, and that leveled our trailer almost perfectly (we were aiming for 14", and hit about 13-1/2").
# 6
etrailer Trailer Hitch Receiver - Custom Fit - Matte Black Finish - Class III - 2"
Installed with myself and 4 jack stands -- 2 to hold the rear end up, 2 to hold the hitch up -- in about an hour and a half (I had to find the lifting point on my Sienna first). There was some grunting to get the hitch in place. If you have a friend and know where the lifting point is you could probably get it done in 45 minutes or less. If you have a car lift and a friend it would take maybe 15 or 20 minutes.The hitch looks as expected from the photos, and the video was a great help. I was worried about bottoming out, but haven't yet (I live near Chicago, so there aren't a lot of uneven surfaces around). My uncle who lives in Denver, CO has a 2006 sienna and bottomed out all the time before he had airbags installed. This may not be as big of an issue on the newer generation.Overall good hitch. I was considering the one by torklift central for aesthetics and possibly more clearance, but went with this one because it was so much cheaper. So far I haven't regretted it.
Great product. Installation was a little more difficult than the video or instructions. The plastic pan / liner has an additional ridge at the back that interferes with the hitch, particularly at the receiver area. We were able to trim the ridge under the receiver and get it tightened up. We were able to get everything in without dropping the exhaust. The video really helped with the installation and it works great. So far we have just used it for a 4 bike rack and are very satisfied. I like it because the receiver is recessed under the bumper a bit which really tucks the bike rack on nicely. Our vehicle is a 2015 toyota sienna Xle all wheel drive.
# 7
etrailer Trailer Hitch Receiver - Custom Fit - Matte Black Finish - Class III - 2"
Installed in a matter of a couple of hours by myself. I used a QuickJack to raise the car up. Otherwise, I would have had a time getting under there. Also used a floor jack with some 4x4s to raise the hitch in place, and then secured with a tie down before getting the 1st couple of bolts in. The image for the cutting of the undertray is not very accurat; you'll need to cut more than shown. Hauled my dirt bike with a HF carrier and had no issues. Definitely recommend this hitch and believe it was worth the extra work to install the hidden version.
I was looking for a hitch so that we can haul more luggage on family vacations. After some research I chose this hitch because of how hidden it is under the vehicle. Installation was great. I watched the video and then was off to the races. I was able to get it on without undoing the exhaust from the hanger. The service from etrailer was great. Shipped fast and the quality looks great.
# 8
Curt Trailer Hitch Receiver - Custom Fit - Class III - 2"
I ordered this hitch on Wednesday (with free shipping), received it on Friday and installed it on Saturday. It fits perfectly on my 2015 Sienna. I had a Drawtite hitch installed which I removed to install this Curt concealed hitch. The Drawtite kept bottoming out with a light duty trailer attached. I installed this by myself, but a second person would be helpful. It took me roughly 2 hours total to remove the Drawtite and install this one. I backed the car up on ramps and loosened the tailpipe hanger behind the right rear wheel. Here is the way I did the 2-man job by myself (I'm 73 yrs. old). After removing the old hitch, I loosely put one bolt (just a couple of turns) in the forward most hitch mounting hole on each side. Then I lifted the hitch and tied it loosely to each of these 2 bolts. Then I was able to maneuver the concealed part of the hitch behind the rear fascia, following the instructions on the etrailer video. After the hitch was in place, I opened the trunk and tied the 2" receiver just below the fascia loosey to the trunk latch. At this point the hitch was loosely suspended in position. I removed the tied up end and bolt from one side and screwed it loosely in place and then did the same for the other side. To finish up I inserted, tightened up and torqued all six bolts. This hitch has no place to attach the wiring plug, so you have to be creative there. All in all a great experience dealing with etrailer and a perfectly fitting, nearly invisible hitch.
2015 Toyota SiennaNice low profile hitch for a Sienna. Easy to install. I installed it by myself. I highly recommend having a helper to lift it into place. Also, if you don’t have access to a lift—which I suspect is most people—get yourself some car ramps and chocks because you’ll need room to maneuver. (That’s the annoying thing about installation videos—including eTrailer’s: who has a lift in their home garage?)
# 9
Curt Trailer Hitch Receiver - Custom Fit - Class II - 1-1/4"
This is a nice hitch and it is as advertised for our 2010 Sienna XLE. fit like it should with no problem. Some trimming of undercarriage sheet metal was necessary, as expected.
Service from etrailer.com was top notch. I am a happy return customer. In my opinion this hitch (C12065) is the best for a Toyota Sienna as ground clearance is an issue. Just installed one on my new '15. On my previous '09 Sienna I had the 2" Curt hitch C13105 which tended to scrap when going up steep driveways. This one sits significantly higher which is great and it also looks much better too. For a Toyota Sienna this is the one to get.
# 10
Curt Trailer Hitch Receiver - Custom Fit - Class III - 2"
Omg, this trailer hitch was so easy to install on my 2025 Sienna Platinum. Has the Etrailers video shows, the bolt holes are already in place and threaded on the van. You just simply lifted up and bolted on once you've taken out the little caps from the frame bolts. I did it myself by propping it up on a box but it would have been much easier with two people to help wrangle it into place. It was honestly the easiest trailer hitch I've ever installed. I also installed the Curt for wire trailer connector and it was super simple to install and works great as well. The Etrailer really has their act together on this stuff
Your packaging of the product for shipment definitely needs improvement. This is the 2nd hitch we have ordered from etrailer and they both arrived with the box torn open with scratches on the hitches. Other than the poor packing of the hitch, the hitch is great and looks great on our 2023 Toyota Sienna LE. Super simple to install and works great for my Thule bike rack. Your videos on installation are so nice to refer to when installing the hitch. Thank you!
# 11
Draw-Tite Max-Frame Trailer Hitch Receiver - Custom Fit - Class III - 2"
Mounted the Draw-Tite hitch this afternoon, hole drilling was a breeze, all bolts fit, no problems
I have purchased three items from etrailer, a hitch for a 2005 Volkswagen Touareg, a cargo carrier for that vehicle, and recently a hitch for a 1998 Toyota Sienna. Very pleased with both hitches and the carrier. The hitches are very well constructed and have been very pleased with how well the hitches fit the vehicles and how quickly I have been able to install them. Also great service on shipping...fast shipping and the price for shipping is right.........free! If you need a hitch.........etrailer is THE place to go!
# 12
Draw-Tite Max-Frame Trailer Hitch Receiver - Custom Fit - Class III - 2"
The hitch installation was fine. All parts worked fine. The only issue was I had to repaint the hitch because of all the paint that had chipped off before it was out of the box. I’m hoping this will not become a rusty eye sore in a year.
Great hitch! This receiver works great with our 4-bike rack, which in turn lets us easily bring our bikes on our road trips.
# 13
EcoHitch Hidden Trailer Hitch Receiver - Custom Fit - Class III - 2"
Looks great on my 2017 Toyota Sienna. Only the receiver can be seen and it is tucked immediately under the bumper for a custom look. This hitch can be installed without removing the bumper. See the installation video for the compatible Class 3 etrailer hitch at 8:25 of the video to see the trick of bending down two tabs which allows the hitch to be installed without removing the bumper. A friend helped hold the hitch it in place while the first bolt was installed on each side. Otherwise one person can do all of the other work without a helper.
Just installed my new hitch. Went relatively smoothly. A few additional hints... it is best to scrape away the "foam-like insulation" or overspray around the outside of the trunk to ensure you can fit the hitch into place. Also be careful not to hit/bend any of the protruding pins (that hold the plastic undermount) with the horizontal bar of the hitch. You also may need to trim a bit of the plastic undermount on the side without the exhaust for a proper final fit. You also need a second set of hands to complete the job. And one final hint, you do not need to completely remove the plastic undermount....leave the pins/clips closest to the front of the van (sienna 2011) in place and let the panel hang down.
# 14
etrailer Trailer Hitch Receiver - Custom Fit - Matte Black Finish - Class III - 2"
Worked as described and the videos were spot on! Would recommended and I’ll use them again!
So easy to install a paraplegic can do it :) Really, I am a paraplegic and had it done in about 1.5 hrs from the time I started. So opening the box, gathering tools, watching the install video... done.
# 15
EcoHitch Hidden Trailer Hitch Receiver - Custom Fit - 2"
Bombproof hitch. Installation was quite a challenge even though I've installed a 1.25" receiver on a different Prius before. A few tips, in no particular order: 1. The directions get driver's side and passenger side mixed up at one point. It's pretty easy to decipher though. 2. If you've never used a bolt fisher before, maybe watch a bit of YouTube on it before you start, and maybe practice fisher removal on a thin scrap of plywood before you commit. 3. Get a bunch of plastic clips in advance because you're likely to break some or all of the ones you remove. 4. You'll need to lift the car a bit, e.g. by backing it up on to a double stack of 2x6 scraps or with jack stands. 5. If you don't have a strong assistant, you'll need a jack to lift it. Because the center of gravity is behind the receiver, you'll also need to slide a strong metal or wood bar/pipe/rod through the receiver hole and a few inches back so you have something to balance on your jack. 6. Safety glasses for all the dirt that will rain down. 7. An extra car or way to get to the hardware store for the tool you're missing.
(2013 Prius Three, self-installed) The HITCH itself is incredible, and great quality. It's a strong performer. If you have a Prius and are doing a self-install, for the love of god just get a Class 1 hitch that's smaller and doesn't have the added bolt holes and wings to attach to the frame. Installation was a bitch, and I found myself regretting my sturdier choice for the Class 2 hitch while I was trying to install. Now, mind you, I used ramps at home in my garage, and did it mostly on my own, not a lift nor a team of people installing. It's heavy -- which means strong for the tow -- so trying to finagle it while tearing apart the underbelly of the Prius was just annoying as hell. Having to cut apart the rainshield/splash shield to even access the places that it needed to go in at the weird angles while holding this heavy chunk of metal up is trying on the patience and determination. I even wound up finagling THREE different jack stands to support parts of it while I attempted to maneuver the thing in, while fighting off the car's rain shield and such. Not to mention, it takes up so much space, being so beefy and strong, that it more or less disfigures the entire bumper and presses the side fender or bumper out in weird ways unless you have 10 times more patience to deal with the added body work to address it being SUCH a *TIGHT* fit, that you have to fight against the whole while. Again, the product *itself* is phenomenal and deserves great reviews. Just don't try to self-install at home on ramps if you've got a Prius, or you'll wind up wishing you had just bought a simpler, lighter, easier to install Class 1 hitch instead. And hopefully the smaller size of the Class 1 won't disfigure your back end.
# 16
Draw-Tite Max-Frame Trailer Hitch Receiver - Custom Fit - Class III - 2"
Well made, well finished and heavy duty product! If you are even halfway handy, you can install this yourself. Like anything, fitting is exact.
Product was all there but arrived with shipping damage. Might want to think about how to keep the heavy items from moving in the shipping carton or protect the outside edges with cardboard or something. I'll touch up the paint but wanted to give some feedback, you guys seem pretty receptive to input. Other than that there was good communication through the whole process. Fast service. Thank you.
# 17
Curt Trailer Hitch Receiver with Standard Drawbar - Custom Fit - Class II - 1-1/4"
Installed Curt 1 1/4" hitch on 9 year old (150K mi) Sienna van. The threaded holes in the old van's frame were rusty/cruddy and needed to be tapped out in order for bolts to thread in (not any fault of hitch, just FYI). Hitch was just a touch too narrow to allow the bolt holes to line up (fault of hitch mfr, or VERY rough shipping), I had to whack on my brand new hitch to open up the total width of the hitch by a few millimeters. My other choice was to return the unit for refund or roll the dice that another hitch would fit better. Using blocks of wood, I was able to hammer the thing into proper dimensions without buggering up the paint and it then bolted in with a perfect fit. I suggest Curt add a bit more slot space for bolt holes. Used it right away to mount a 4 bike carrier, travelled throughout mountains, with plenty of off-road driving, the hitch never bottomed out (though I was very cautious to cross depressions at shallow angles). Old minivan, loaded heavily, taken off-road proved to me this hitch provides ample clearance.
The trailer hitch receiver (item C120653) fits well to my 2008 sienna. Installing was easy with 2 car jacks lifting the heavy receiver.
# 18
Draw-Tite Max-Frame Trailer Hitch Receiver - Custom Fit - Class III - 2"
This is a nice, heavy duty hitch. Probably heavier duty than the 2011 Rav4 I put it on, but I like the 2" size reciever for the flexibility. You can always adapt down, but going up can be tricky. It was about a 20 minute install with about 40 minuets of up and down looking for a tool. Mine dod not have the bolt on muffler hanger the instructions referenced, but that was just a couple of bolts I didn't have to worry about. One trick I have learned with installing hitches on the ground by yourself is to use a jack to hold it up and in place while you start the bolts. The other is to run the bolts into the holes before you get the hitch into position. If the hole wasn't use, it ca be full of grit and road grime and it is a lot easier to deal with it before you have an 80 pound hitch hovering over you head. As always, eTrailer was a great source. I think this is the seventh hitch I have bought and installed from them over the years. I still the they need to include an "I got hitched at eTrailer" bumper sticker with every purchase, but I suppose solid service and affordable pricing is good enough.
The vertical plate on the passenger side was visibly bent, maybe from weld - hard to say. This made the holes for mounting the hitch to the car frame too tight by about an 1/8". I had to auger all 4 holes out with a Dremel cutting wheel and then repaint. This made the installation quite a bit more difficult and time consuming. The hitch is on and works fine but it didn't need to be this hard. The first image is the bent passenger's side plate (the part coming off the round tubing and running up to where the hitch bolts to the car frame). The second shows the straight driver's side plate. Two images of the resulting misaligned holes. I removed about an 1/8" of metal from the outsides of all 4 holes which juuustt barely allowed me to get all four bolts threaded. One other note: This hitch went on a 2017 Toyota Rav 4. 3 of the 4 threaded frame holes were unusable: rust and corrosion made threading the bolts impossible. I had to purchase a 12mm x 1.25 tap and clean out the threads first. The one good set of threads had a pre-existing bolt in it which kept those threads clean. The other three were open to the elements and didn't fare so well. They were fine after using the tap to clean them out.
# 19
Curt Trailer Hitch Receiver - Custom Fit - Class III - 2"
Perfect high quality Hitch was selected. The testimonials with pictures/videos was excellent and helped me with my decision. Received the hitch in 3 days. The installer that etrailer recommended (TowPro, Duluth, GA) did a first class job at a reasonable price. Start to finish a great experience.
Wanted this hitch for bike rack only - no towing anticipated. Easy to remove existing bolts and discard. New (supplied) bolts effective. Only thing negative is corrugated box got banged up which means the product suffered minor scratching. Entire process took 2 of us 25 minutes. If you are trying to do this by yourself you'll need a jack stand. Shimmying the box for one side is - maybe - effective, but I would not recommend... all in all good product and value. Hitch is pretty heavy... all good. A big + was install video. Helpful
# 20
Draw-Tite Max-Frame Trailer Hitch Receiver - Custom Fit - Class III - 2"
Exactly as described! I have an older 2011 Honda Odyssey that I needed a hitch for and didn’t want to spend a ton of money for the minimal use it would get. When I researched hitches etrailer kept coming up with great reviews. Their site rated the install at 3 out of 10 stars and the reviews said 1-2 hours doing it alone. It was super easy. No ramps or special equipment or fancy tools needed!
Great quality hitch. Easy install. I used jack stands and a cinder block to hold it in place while I bolted it on. No rust on it yet which is good for living in New England.
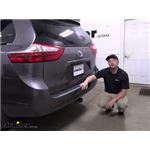
Best 2015 Toyota Sienna Trailer Hitch Options

Hey, everyone, Ryan here at Etrailer. Today we're gonna be checking out the best trailer hitch options for your 2015 Toyota Sienna. There are quite a few different hitches available for the Sienna, and just to kind of simplify everything today, I grabbed the top five, at least in my opinion, just to kind of narrow everything down. Three of 'em are going to be less visible. That'll include this Etrailer Hitch, this CURT one and this Draw-Tite, and then these two are gonna be more visible, meaning you'll be able to see kind of the main body and everything on the hitch here. So this one is a CURT, and this one is made by Draw-Tite.
2015 Toyota Sienna etrailer Trailer Hitch Receiver: Complete Installation
Hey everybody, Ryan here at etrailer. Today on our 2015 Toyota Sienna, we're going to be taking a look at and showing you how to install the etrailer.com Class 3 two inch trailer hitch receiver. Out of all the hitches available for the Sienna van, to be honest with you, this one's probably my favorite. And that's really for a few different reasons, the way it's going to look, the clearance that it's going to give us, and just the overall versatility of it.So let's talk about that appearance a little bit. For the most part, it's going to be completely hidden. Really the only thing you're going to be able to see is the receiver tube opening here.
How to Set Up Your etrailer Trailer Hitch Receiver on a 2015 Toyota Sienna

Today on our 2015 Toyota Sienna we are going to be taking a look at, and I'm going to show you how to install the etrailer.com Class III Trailer Hitch Receiver, part number E9887. This is what our hitch looks like when it's installed. You see the cross tube is visible, but it does sit up nice and tight up against the bottom of the vehicle. Our receiver tube is tucked in underneath the outer edge of our bumper fascia, so we're not going to have to worry about hitting our legs, or our shins on it when we're loading and unloading the back of the vehicle. It's going to be a Class III hitch, it's going to be 2" x 2". It's going to have a nice reinforced collar to give it a little extra stability on the receiver tube.
DIY 2015 Toyota Sienna Installation for the Curt Trailer Hitch Receiver

Today on our 2015 Toyota Sienna, we're gonna be taken a look at and gonna show you how to install the Curt Class 3 Trailer Hitch Receiver, part number C13343. This is what our hitch looks like when it's installed. You can see a cross tube that's hidden behind the bumper fascia so it helps maintain a nice clean look.This is gonna be a class 3 hitch, it's gonna be 2 inch by 2 inch. You're gonna have a reinforced collar to give you a little extra spilling on your receiver tube, hitch pinholes gonna be 5/8th inch in diameter. Now the hitch pin and clip does not come with this hitch, however you can purchase one here at eTrailer.com. It's gonna have rolled steel styled safety chain loops, and you see it's gonna be plenty of room for different size safety chain hooks.As far as weight capacities go, we're gonna have a 525 pound max tongue weight, which is a downward pressure on the inside of the receiver tube, and a 3,500 pound max trailer weight which is the trailer plus the load included.
Mount: Draw-Tite Max-Frame Trailer Hitch Receiver on a 2015 Toyota Sienna

Today on our 2015 Toyota Sienna we're going to take a look at and also show you how to install the Draw Tite Max Frame Custom Fit Class III Trailer Hitch Receiver. Offering the 2 inch by 2 inch receiver tube opening, it's part number is 76112.Speaker 2: Here's what this hitch looks like once it's installed on the vehicle. As you can see, it's nicely hidden to all you really see is the receiver tube and the safety chain connection points. Here you can see how well-hidden that cross tube is, just up behind this lower part of the fascia, which is what's going to be the big differentiating factor between this and the other hitches available for this vehicle. This hitch features the 2 inch by 2 inch receiver tube opening with nice welded on reinforcement collar around it. Features 5/8 inch hitch pin hole, which is going to be good for securing all your Class III accessories. It also has the smaller 1/2 inch hole, which is going to be good with a J pin stabilization system, which is going to help eliminate some of the shake and rattle between the shank and the receiver tube for a quieter ride.
DIY Install: Draw-Tite Max-Frame Trailer Hitch Receiver on your 2015 Toyota Sienna
Today on our 2015 Toyota Sienna, we will be taking a look at and installing the DrawTite Match Frame Custom Fit Class 3 Trailer Hitch Receiver, part number 75237. Here's what our hitch is going to look like once it's installed. It's going to have that nice sleek, round tube design across the bottom of our vehicle the full width, with a nice black powder coat finish that's going to be high gloss and also prevent any kind of rust and corrosion. With a fully welded design and plate steel chain tie-downs, it's going to add extra strength and durability. It's going to have a 2" x 2" receiver tube opening, offering a 675 pound ton weight capacity, and 4,500 pound towing capacity. With weight distribution, the ton weight stays the same, but the gross trailer weight is going to go up to 5,000 pounds. On the side here we're going to have a 5/8" pin hole for all your 2" receiver accessories, and just in front of it you'll see a 1/2" pin hole.
Installation: Curt Trailer Hitch Receiver on a 2015 Toyota Sienna
Today on our 2015 Toyota Sienna, we will be taking a look at and installing the Curt Custom Fit Class 2 Trailer Hitch Receiver, part number C12065. Here's what our Curt Custom Fit Class 2 Trailer Receiver Hitch is going to look like once it's installed on the back of the vehicle. It's going to have that rectangle tube design and it's going to be nice and sleek against the back end of the vehicle, curving back slightly at each end of the vehicle kind of with the curves and shape of the Sienna. Now, it's going to have that black powder coat finish that's going to help prevent any rust and corrosion. It's going to be a high gloss, so it's going to look really nice, as well as the fully welded design, it's going to add extra strength and durability over a long period. Now it's going to have that 1 1/4 by 1 1/4 receiver tube opening, offering a 350 pound tongue weight capacity and 3,500 pound towing capacity. That's going to be your trailer with all of your items on it. Located here is going to be a half inch pin hole that's going to be so you can attach all of our accessories.
Trailer Hitch Installation - 2015 Toyota Sienna - Hidden Hitch

Today on our 2015 Toyota Sienna we'll be taking a look at and installing the hidden hitch custom fit class 2 trailer hitch receiver part #90217. Here's what our class 2 trailer hitch is going to look like once it's installed on our vehicle. It's going to have that nice round tube design that's going to kind of angle back with the vehicle and be a full width hitch. Now you can see it's going to have a nice black powder coat finish that's going to look real good and have a nice aesthetic look on the back of our vehicle. As well as a black powder coat finish it's going to help prevent any kind of rust and corrosion. With it being fully welded, and having the plate steel design, it's going to add to the extra strength and durability of our receiver hitch. Now with it's inch and a quarter by inch and a quarter receiver tube opening it's going to operate 300 pound tongue weight capacity and 3,500 pound towing capacity.
Installing the Curt Trailer Hitch Receiver on your 2015 Toyota Sienna

Today in our 2015 Toyota Sienna we're going to take a look at and show you how to install the Curt Custom Fit Class three trailer hitch receiver. It says the two inch opening part number is: C13105. Here's what the hitch looks like once we get it on the vehicle. It gives us a nice two inch receiver tube opening where it'll work out great with your bike racks, your ball-mounts, hitch cargo carriers, whatever the case may be really. Tons of accessories available for this. Your pinhole location isn't too far from the bumper so it should work with a lot of the accessories. The pinhole is a 5/8ths diameter pinhole so all of the 5/8ths anti-rattle bolts, hitch pins and clips, anti-rattle devices, all that's available and it'll work out great. Our safety chain connection points here on either side. If you're going to be doing any trailing or if you need some extra support from a strap or something with something you might be hauling you'll have that option available as well. Now as you can see it's a full cross tube bumper on the rear, which is pretty typical of a hitch going on the Sienna here.
Trailer Hitch Installation - 2015 Toyota Sienna - Hidden Hitch 90214

Today on our 2015 Toyota Sienna, we're going to take a look at, and show you how to install the hidden hitch custom fit trailer hitch receiver, part number 90214. This is a class II hitch with an inch and a quarter opening. Here's what the hitch is going to look like once we get it installed in the vehicle. As you can see, it gives us a nice clean look. It's about as wide as what the car is, and it's pretty standard on a Sienna. If you want a hitch, it's going to look something like this.
Mount: Draw-Tite Trailer Hitch Receiver on a 2015 Toyota Sienna
Today on our 2015 Toyota Sienna we're going to take a look at and show you how to install the Draw-Tite Custom Fit Trailer Hitch Receiver. This is a Class Two, 1-1/4 inch hitch, its part number is 36513. Here's what the hitch is going to look like once we get it installed in the vehicle. As you can see it gives us a nice clean look. It's about as wide as what the car is and it's pretty standard on a Sienna. If you want a hitch, it's going to look something like this. This one's got the slightly smaller tube that comes across with it being a Class Two hitch.


What our customers are saying:
"Excellent company to deal with....I received the hitch I ordered promptly and easily installed it as the instructions described. I might add the hitch is mostly hidden from view without detracting from the appearance of my van."