

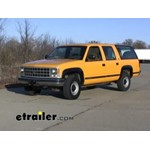
Directions for Installing a Brake Controller on a 1989 Chevrolet Silverado Without Towing Package
Question:
How do I install a Brake Controller on my 1989 Chevy Silverado pickup, without a towing package?
asked by: Bonita E
Expert Reply:
Installing a brake controller on your 1989 Chevy Silverado pickup is pretty straight forward. To start, you will need all of the parts for the complete installation of a trailer connector and the brake controller.
The parts needed are a 4-Way trailer connector, item # 118001, or # 118315, a Brake Controller 7 & 4 Way Installation Kit, item # ETBC7, and a brake controller of your choice.
Brake controllers are not vehicle specific but there are some things to keep in mind. A proportional controller provides much smoother stopping than a time delayed controller. Proportional controllers also help to conserve the vehicle and trailer brakes by applying the trailer brakes only as much as needed for the speed in which the tow vehicle is stopping.
For an economical brake controller that is proportional and easy to use the Tekonsha Voyager Brake Controller, item # 39510, is a good choice. For a brake controller with more options the Tekonsha Prodigy P2 Brake Controller, item # 90085, is an excellent choice. This controller has several features for advanced towing like boost settings and it will function with electric over hydraulic braking systems.
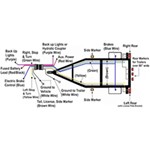
Start the installation by installing the 4-Way wiring harness. Either find the connector behind the rear bumper near the driver's side frame rail to install the # 118315 harness or use a circuit tester, item # PTW2993, to wire the # 118001 4-way harness to the vehicles tail light circuits behind the vehicle tail lights.
Now, connect the 4-way connector to the 4-Way connector on the back of the 7-way connector provided in the # ETBC7 kit. There will be 4 wires remaining. Attach the white wire to a good ground connection on the vehicle frame. The blue wire is connected to the white wire in the duplex cable provided in the kit and the black wire is connected to the black wire in the same cable. The remaining wire, purple or yellow, is for the vehicle reverse light circuit. If needed, it is spliced into the reverse light circuit behind one of the tail lights. If not needed it can be tied up out of the way with a zip tie.
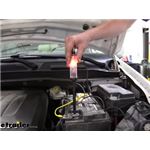
Next, run the duplex cable forward to the engine compartment. Avoid areas that could pinch, cut or melt the wire. Under the hood, cut this wire off with enough length to run the black wire to the battery and the white wire into the cab of the vehicle to the mounting location for the brake controller. Use the included 40 amp circuit breaker and attach the black wire to it and then the positive battery terminal. Connect the white wire in the cab of the vehicle to the blue wire exiting the back of the brake controller.
Now, use the leftover duplex cable and connect the white wire to the white ground wire exiting the brake controller and the black wire to the black power wire exiting the brake controller. Run the cable through the firewall to the vehicle battery and connect the white wire to the negative post and connect the black wire to a 20 or 30 amp circuit breaker and then to the positive battery post.
The final wire connection needs to be made to the vehicles stop light circuit. Using a circuit tester find the wire that only has a signal when the brake pedal is pressed. This wire is located under the dash behind the brake pedal switch. Attach the red wire exiting the brake controller to this wire.
All that is left is to mount the brake controller in an accessible location and set it up for towing using the instructions from the brake controller you select. Links to brake controller installation instructions, instructions for the brake controllers, and items mentioned are provided below.


Products Referenced in This Question
T-One Vehicle Wiring Harness with 4-Pole Flat Trailer Connector

- Custom Fit Vehicle Wiring
- Trailer Hitch Wiring
- No Converter
- Custom Fit
- 4 Flat
- Tekonsha
more information >
Tekonsha Voyager Trailer Brake Controller - 1 to 4 Axles - Proportional

- Trailer Brake Controller
- Proportional Controller
- Electric
- Manual Leveling
- Under-Dash Box
- Dash Mount
- Up to 4 Axles
- Indicator Lights
- Up to 90 Degrees
- Tekonsha
more information >
Tekonsha Prodigy P2 Trailer Brake Controller - 1 to 4 Axles - Proportional

- Trailer Brake Controller
- Proportional Controller
- Electric
- Electric over Hydraulic
- Automatic Leveling
- Under-Dash Box
- Dash Mount
- Up to 4 Axles
- LED Display
- Up to 360 Degrees
- Tekonsha
more information >
Universal Installation Kit for Trailer Brake Controller - 7-Way RV and 4-Way Flat - 10 Gauge Wires

- Accessories and Parts
- Trailer Brake Controller
- Installation Kits
- etrailer
more information >

Featured Help Information
Instructions
Miscellaneous Media


Continue Researching
- Shop: Go Power Overlander Expansion Kit - 200 Watt Solar Panel
- Search Results: rvk3500
- Shop: Curt Battery Box for 12V, 5-Amp Battery - Top Load
- Search Results: lh37fr
- Search Results: 34282182
- Shop: Mighty Cord RV Power Cord - 50 Amp - 25'
- Search Results: breakaway battery box
- Shop: Mud Flaps
- Shop: Redarc Solar Panel Corner Mounts - Qty 4
- Shop: Side-Door Bar Lock Assembly - 55" Long
- Shop: Replacement Operator, Knob and Screw for Ventline Ventadome Trailer Roof Vents w/ Wedge-Shaped Dome
- Shop: B&W Companion 5th Wheel Trailer Hitch - Dual Jaw - 20,000 lbs
- Search Results: washer
- Search Results: on demand water heater
- Search Results: 34282181
- Shop: Brake Controller
- Q&A: Installing a Brake Controller From Scratch on a 1989 GMC 1/2 Ton Pickup
- Shop: Trailer Wiring
- Article: Brake Controller 7- and 4-Way Installation Kit (ETBC7)